

2023 Ornament Instructions
Thanks for choosing to make your own layered ornament with me!
Method:
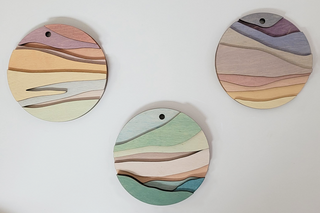
You'll see below there will be the colour map; a drawing of the finished ornaments uncoloured with numbers for the corresponding to each section. These numbers will not be on the wood pieces, so they do not show through the paint. Please note you will not be painting each section in order as a few of the colours will build off each other to create a beautiful cohesive piece of artwork.
Dip the brush into the water and use water colours as indicated in the colour map as shown mixing the colours as desired in your paint palette. It is best to use small amounts of each colour as it is easier to get the colour you want that way. Control how pigmented you want each colour by adding more or less water.
You can use the back of each piece of wood to test the colour to see what it will look like on the wood.
The colour map is a suggestion, but feel free to mix the colours; however, you would like to create your own unique ornament.
Some of the pieces you will be painting will need to be painted two different colours. It is best to stack each of the pieces before painting and paint only the showing sections as the upper portion may be one colour and the bottom portion another.
Clean the paint brush in a cup of water and repeat the process till your artwork is complete!
Colour Map
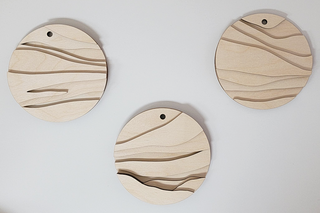
On the back there are numbers and letters. Group all of the numbers together then flip all of the shapes around in each group and arrange the pieces on top of each other as shown below. The base will be the full circular shape with the logo facing down. With each letter and number facing downwards as well, so numbers aren't shown in front.
You will then use the colour recipe below to tell you which colours go with each section as illustrated below. The numbers will not be showing on the face of each of your wood pieces.
-

Ornament 1
-

Ornament 2
-

Ornament 3


Colour Recipe
Before/After Painting
Final Steps
Once the pieces are dry after painting put a small bit of glue on the underside of the pieces with the letter and number and glue them on top of each other as shown with the colour map above in alphabetical order.
Once the glue has dried, string the ribbon through the top and tie a bow.
Your ornaments are now ready to be added to the tree or placed on your wall year-round!